How do you make sure the backups you take are as secure as your Mac itself? By encrypting the drives!

Encrypting backups is a controversial subject. For some people, it's the only way to make sure their data is secure and no one else can get to it. For others, it defeats the very purpose of backup, allowing any error or defect to render the data unrecoverable.
If saving your photos is more important to you then securing your financial data, skip encryption. If you have more valuable information on your desk than on your backups, skip encryption. If you worry that someone else will get access to your backups and your data then, by all means, encrypt away. Here's how.
How to encrypt a Time Machine backup
Time Machine is Apple's built-in set-it-and-mostly-forget-it backup system for the Mac. Turn it on and it'll make a backup of your Mac and then keep it incrementally up to date over the hours, days, and weeks that follow. While it's not encrypted by default, you can enable encryption when you set it up.
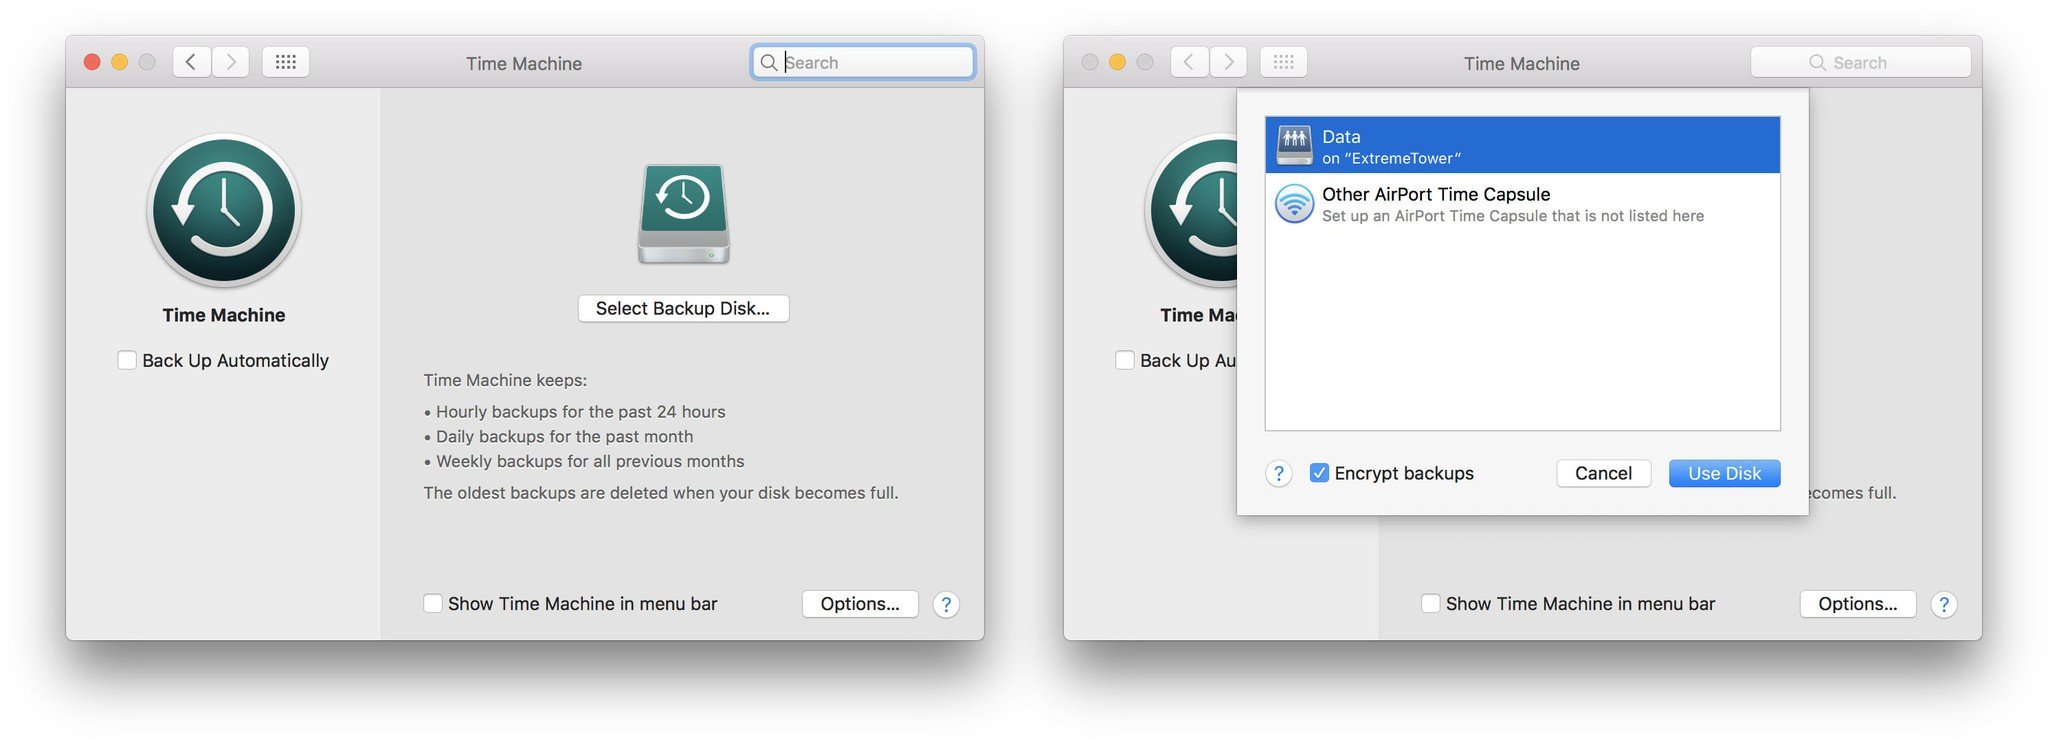
If you're attaching a new drive, Time Machine might detect it and ask to use it. In that case:
- Check the Encrypt backups box at the bottom left.
- Click on Use as Backup Disk.

If it isn't detected or you want to use an already connected drive:
- Click on the (Apple) icon in the Menu bar.
- Click on System Preferences.
- Click on Time Machine near the bottom.
- Click on Select Disk....
- Click on the Disk you want to use for your backup.
- Check the Backup Automatically box so you don't have to remember to do it manually.
- Check the Encrypt backups box at the bottom left.
- Enter a password to encrypt the disk.
If you have an existing, non-encrypted Time Machine backup on the same volume, you'll have to remove the disk first and then re-add it as an encrypted volume.
Make sure you copy off any old files or versions of files you might need before hand, though, because you'll lose it when the drive is reset for encryption.
(You can get a new drive but that would leave your old drive unencrypted and vulnerable.)
How to encrypt a clone backup
If you're using a clone backup like SuperDuper or Carbon Copy instead of or in addition to Time Machine, you can encrypt the drive you're cloning to. It's a two-step process to set up but, once you've gotten it up and running, it's just as easy to maintain as any other cloning system.
- Boot from your cloned backup drive.
- Re-install macOS Sierra (or whatever version you're currently using) to create a recovery volume on that drive.
- Turn on FileVault in System Preferences.
Unless you have a recovery volume, you won't be able to boot reliably from the clone or turn on FileVault. Once that's done, you can boot back to your primary drive once FileVault gets started; you don't have to wait for it. And once the clone backup is encrypted, you'll be able to resume your regular, iterative backup process.